How to Remove Flow Restrictor from Moen Shower Head
Knowing how to fix a couple of issues in your bathroom can give you peace of mind. After all, the last thing you want is your family complaining about how bad the shower is and how they can’t get a relaxing shower after a long way, or even worse when you get to pay a plumber to come to fix minor problems you could fix yourself. One of the most important skills you need to learn is how to remove flow restrictors from the Moen shower head.
You might be taking a nice cold bath and you notice the flow of water from the moen shower head reducing or there is no pressure at all. There is a certain pressure that we like to see the water from the shower flowing; therefore, when you start noticing a slight change, the shower no longer feels enjoyable. When this happens, it could be an indication that the flow restrictor is clogged. A significant number of companies, including Moen fix a flow restrictor at the neck of the showerhead to conserve water.
Although the flow restrictor is handy, at times it can give you a headache, and one of the most common problems you are likely to experience is clogging. When this problem is not looked into, you may have to buy a new shower head.
When removing clogs in a Moen shower head, you need to be extremely careful because a wrong move could damage the threads in the showerhead.
How to Remove Flow Restrictor from Moen Shower Head
If you want to remove the flow restrictor from your Moen shower head, here’s what you need to do:
Tools You’ll Need
To prevent any unforeseen problems when removing flow restrictions from your Moen shower head, follow these simple steps:
Step 1
Place a cloth on the showerhead connection as you tighten the jaws with the adjustable wrench. Secure the shower pipe near the wall with one hand and turn the showerhead connector in a counterclockwise direction using an adjustable wrench.
Step 2
Gently remove the rubber O ring gasket with your fingers. Don’t remove the ring with anything other than your fingers as this could damage it because of its delicate nature. Place the palm of your hand on the showerhead and shake the screen loose until it comes out of the showerhead
Step 3
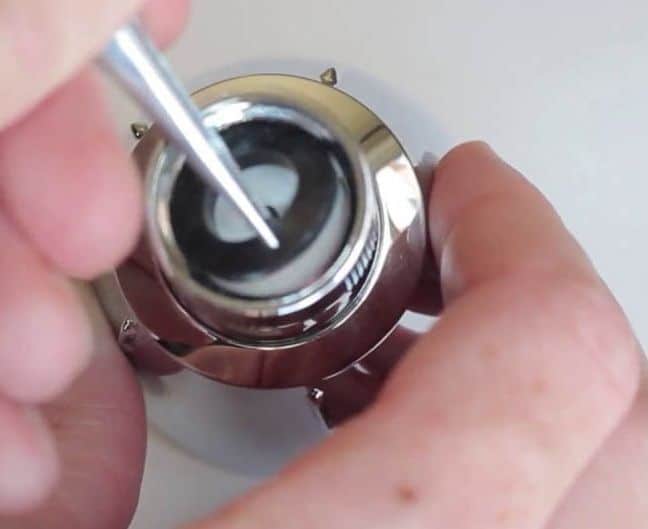
Use a screwdriver to insert into the corner tip of the shower head’s flow restrictor. Find the flow restrictor, which is a flat plastic piece in the neck of the showerhead with small perforations.
Step 4
Use a screwdriver to slowly remove the flow restrictor from the neck of the showerhead. You need to be extremely careful when dealing with the inner threads of the showerhead to avoid damage.
Step 5
Place the screen back into the showerhead and put back the O ring against the screen, ensuring it is secured and tight. In order to ensure that it is tight and secure, use plumber tape to wrap around the shower arm threads. Thread back the Moen shower head to the shower arm in order to be able to turn it using your hand.
Step 6
Use a cloth (again laid on the connection) to hold the shower arm and turn the connections gently with the adjustable wrench. When completing this last step, you will be able to remove flow restriction for the Moen shower head successfully and put everything together.
Before you perform the steps listed above on how to remove the flow restrictor from the showerhead, make sure that you close all water faucets and the showerhead must be completely drained off the water before you commence.
benefits of having a flow restrictor in my shower head
A flow restrictor is a small device that is inserted into a shower head to help regulate the amount of water flow. This is beneficial because it can help to conserve water, which is good for both the environment and your wallet. Additionally, it can help to prevent your shower from becoming too hot or too cold, as it can help to regulate the water pressure.
FAQs
What is a flow restrictor and why would I want to remove it from my shower head?
A flow restrictor is a small disc or screen that is installed in the shower head to help regulate water flow. While it can be beneficial in conserving water, some people prefer to remove the flow restrictor to increase water pressure.
How do I know if my shower head has a flow restrictor?
Most shower heads will have a small hole or screen on the underside where the water comes out. This is where the flow restrictor is located.
Is it difficult to remove the flow restrictor from my shower head?
No, it is not difficult to remove the flow restrictor from most shower heads. You will need a small screwdriver or other tools to remove the screws or clips that hold it in place.
Are there any risks associated with removing the flow restrictor from my shower head?
There are no risks associated with removing the flow restrictor from your shower head. However, you should be aware that it will result in increased water usage.
Conclusion
If you are experiencing low water pressure in your shower, one possible culprit is a flow restrictor. Flow restrictors are designed to reduce water waste and lower water bills, but they can also cause a significant drop in water pressure. While it is possible to remove the flow restrictor from your shower head, it is not recommended. Doing so can void the warranty on your shower head, and it may also increase your water bill. If you are unhappy with the water pressure in your shower, it is best to consult a plumber or the manufacturer of your shower head for advice on how to improve it.

I have the Costco purchased Engage Magnetix 26010SRN. After removing the gasket there is the plastic gear that changes output from shower to handheld. It appears that the restrictor is not locatable as it must be on the other side of the head switching gear. If anyone knows how to remove restrictor without breaking the shower head, please let me know!
Hi Pam, I bought the same shower head and it took me some time to figure it out, but I got the restrictor out. It is the blue piece in the part of the shower closest to the wall pipe. Take out the X shaped plastic, then turn it over and “pop” the blue piece out from the back with a thin screwdriver (through the hole). I just tested it and wow. What a difference.
Thanks Dave. That was very helpful. I just removed the restrictor and works great.
I have the Costco purchased Engage Magnetix 26010SRN. After removing the gasket there is the plastic gear that changes output from shower to handheld.
Is the restrictor opposite the ball in the connector? When I remove the washer there is no screen just a white plastic device with a very small o ring in center. It is lodged tightly is this what is to be removed?
how do you remove the ball joint from the moen adler shower head/
How do you remove the threaded ball connector from a moen adler shower head?
The restrictor is NOT in the shower head, it is in the “ball pipe” that allows the head to bend. The pipe between the wall pipe and shower head